Monday, June 9, 2014

DIY Flip-flop Wreath Tutorial

Friday was my first official day of summer, and I can honestly say I thought it would never arrive! This has been the longest year ever, and I am so happy to finally have a break. I start two weeks of classes today, so I promised myself I wouldn't even THINK about anything school related this weekend.... So please forgive me for posting something that has nothing to do with teaching :)

My friend and I have a craft group and try to make something each month.... But the last few months we've been slackers and haven't done anything... Anyway, the other day she saw a cute wreath that she wanted to make, so we went to Walmart Saturday night and set out on a crafting adventure! I decided to take pictures as we made these because I couldn't find a lot of tutorials on Pinterest.

Forgive me in advance, I don't really care about fancy photography, so all my photos were snapped with my iPhone. That's just how I roll ;)

basic supplies: flip flops, 14" foam circle
Okay here we go....
Supplies needed:
* 4-6 pairs of colorful flip-flops (we found ours for 98 cents each at Walmart!)
*14" foam circle (I used a foam rectangle board and cut out 3 circles so I could make some for some family members) just kinda depends on what you can find in your local craft store -- I would suggest a FLAT one instead of a round one so that the flip flops will glue on better.
* large flower (Walmart didn't have a great selection.... Try Michael's or Hobby Lobby for really cute ones!)
* ribbon to hang it (Walmart craft section or floral section)
* hot glue gun

You will want to get your circle first, then spread out the flip flops to get an idea of how many you need ** make sure you buy the SAME SIZE flip flops. Also keep in mind that depending on the size of circle you get, you will need more or less flip-flops than I used. **

Step 1: spread all the flip flops out the way that you want them to be on the wreath. Play around with it as much as you want right now (as you can see, I overlapped mine just slightly).
Step 2: glue the flip flops together (I did left over right for each pair of flip flops)
Step 3: once the hot glue has dried, lay the flip flops out again to make sure they fully cover the wreath. I've included a few pictures to show you how I layered them. I also used a sharpie to mark where each set of flip flops sat on the wreath (this way I could take them off and glue one pair at a time and be able to put them back in the right spot) -- your flower will cover the middle of the circle, so don't worry about the marker lines.
Step 4: glue each pair of flip flops onto the wreath; you will find a natural "over/under" layout that occurs as you put each pair on the wreath -- just slide them in carefully and make sure to use plenty of glue.  Let the wreath dry for a few minutes after gluing each pair of flip flops onto it.
Step 5: glue your flower into the center of the wreath (you can also add small flowers around the wreath for accents if you wish). You can also add more glue around the edges of the flip flops at this time if necessary to make sure they are glued on extra well.

Step 6: this was definitely a "winging it" step.... Since we were using a foam board, and not an actual wreath, there wasn't a way to hang it.... We just poked two holes with a small screw driver :) here's a picture of the back-side of the wreath so you can see how we tied the ribbon. You could also glue the ribbon, but I felt like a hole in the back worked better. 

Ta-da. There you have it. A fun, summery wreath, for about $10-12. If you make one, I would love for you to share a photo on my facebook page. Thanks for stopping by!


Thursday, May 22, 2014

College Bound Kids {a new packet}

As teachers and educators, I think we all agree that college is important. As a first generation college graduate in my own family, I can honestly say that college was never really on my to-do list growing up. It wasn’t until my aunt decided to take it upon herself my senior year of high school to see that I went to college, and she told my mom that she had to kick me out! I often thank her for that, even though I hated her at the time! I never pictured myself as “college material” and I certainly never dreamed I would someday have a master’s degree!  College just wasn’t something we discussed growing up…

Well, next week at school, we will be having "college week". This is a new tradition that we started last year, and is definitely something I look forward to as the school year is coming to a close. Last year it was all put together pretty quickly, and we sort of made it up as we went along.... This year I decided to make a packet for all of the teachers at my school to use, and today I'm finally getting around to blogging about it. So what exactly IS college week, you might ask? Well, college week is designed to get even the littlest of kids to think about college and help your students set goals and get excited NOW about attending college in the future.

Because my school is K - 6, I wanted to make the packet as versatile as possible, so there are writing pages with both primary and secondary lines, and more than enough activities to keep any grade level engaged throughout the week. Not every page will be used depending on your grade level, but there are plenty of activities to choose from.  Here are some of the highlights:

* College application
* College research page
* Vocational / trade school research page (great for upper grade students who may express interest in trade school over college)
* College K-W-L
* Create a mascot
* If I were a college student – graphic organizer & writing pages
* I would make a great college student because… - graphic organizer and writing pages
* College is important because… - writing & coloring page
* Things I can do now to prepare for college – graphic organizer & writing pages
* When I grow up – writing & coloring page
* Blank graphic organizer and writing pages
* Characteristics of great college students anchor chart (cut-n-glue version is perfect for the littlest college-bound kiddos!)
* Multiple graphic organizers for college versus elementary school, compare two colleges, etc.
* College words word-search
* Design you own dorm room
* Bulletin board materials with endless possibilities (college pennants, college kiddos, caps, etc.)
* College Week Participation Certificates (color & black and white)

If you are interested in having college week, this packet is a great resource to help you get started. Each day, I start by showing my class a YouTube video about one of the colleges here in Utah, and of course you can find videos for colleges in your own area by searching on YouTube... My kids get so excited each time we get to take a virtual tour of a college campus in our area. The videos are also great to use with the Venn diagrams in the packet if you want your students to compare and contrast two colleges in your area.  I will post my youtube playlist at the bottom of this post :)

A few other suggestions to make a great college week:
** Call local community colleges or universities in your area and ask to speak with a recruiter -- these folks are usually more than happy to send you some college "swag" to share with your students (I have gotten pencils and pennants in the past).
** Invite a recruiter to come to your school and speak to the older students about things they need to do to become “college bound”.
One class made a poster and had everyone
sign it to commit to attending college!
** Hold a food drive during the week, and have students donate food in bins labeled for their favorite university in your area…. See which university can get the most food.
** Have a theme each day – such as team colors, university tee-shirts, athletic day (many of the boys wore school jerseys, and some of my girls dressed as cheerleaders for various schools), cap & gown day (if they have a cap and gown from a parent, or you could do a dress-up day where they wear nice clothes and make them their own caps to wear).
** Hold a “commencement” ceremony (as a class, grade-level, or whole school).  We are doing this next week, but it’s new this year, so I don’t know much about it… I’ll have to blog about it later…  I have included a few certificates in the packet if you want to do a commencement for your future college grads.


Ok, I have rambled on long enough… click {HERE} to check out the packet on TPT… if you would like to win a copy, comment below with the university you graduated from… I will pick a winner Friday night whenever I get home from school.  Enjoy!
Here are a few teachers from team USU (I'm in the middle in my cap, gown, and hood). Go AGGIES!
here's a little playlist I put together last year... this highlights some of the schools here in Utah:

Sunday, March 9, 2014

Bright Ideas: Recess Check-out Chart

Welcome to another month full of bright ideas. Today I'm going to share a quick idea to help keep recess equipment organized and know who has your equipment during recess, while also allowing everyone to have a turn using the recess equipment. Many of you probably already have a card pull chart (or some other type of color-coded behavior system) already in place in your classroom, and this idea builds on that concept. Here is a picture of my card pull chart....  Let's not discuss the fact that it is ripped and falling apart... This baby has been with me through 3 different schools over 8 school years, and is on its last threads.... I plan in making a new one this summer. Anyway, the card pull system is used school-wide at my school, so it's something I have to have in my classroom anyway...

Okay so about recess.... I was getting tired of my equipment being lost and scattered all over the playground and field, and I was tired of the same few kids always taking the soccer balls and kick balls. It was exhausting to try and keep track of who had and hadn't had a turn, and that's when my bright idea was born! Because my kids already had a number on the card pull chart, I just wrote each of their names and numbers on a large craft stick and stuck it in the card pull chart behind their cards, and quickly glued some pictures of the equipment on empty pocket envelopes, and created a recess check out chart!

Here's my recess check-out chart. As you can see, it's nothing fancy. And before you ask, no, I don't have the graphics available for you to print.... I might make a cutsie packet at some point, but I seriously just opened a blank word document, searched for the graphics I needed, and quickly printed them.  No time for cute fluff!

Here are my check-out chart rules:

1. You must be on green to check out equipment.
2. You can check out equipment once a day.
3. If you do not return the equipment at the end of recess, your stick is moved to the "lose a turn" spot for the week (or until lost equipment is found and returned.)
4.  If equipment is permanently lost or damaged, your stick might be thrown away or left in "lose a turn" spot for more than a week.
5. Only the recess chart helper or the teacher can reset the recess chart.

You can use these rules in your classroom, or use mine as guidelines to create your own. I think the rules are pretty much self-explanatory, but it will quickly explain how I use them. Every child starts on green each day, so rule #1 goes with that. If they can't follow directions in class, they can't take equipment out to recess. You can decide if you like this rule or not. It works great in my room, especially since I don't have a ton of equipment to begin with. Once they have had a turn, they must return the equipment to the recess basket, and put their stick in the "already had a turn" spot. That gets reset every day, so they know that they will get another turn tomorrow.... The great thing about this is that the kids are learning how to SHARE!! They are learning to plan ahead and play with others... I often hear them talking and making plans for who will check out equipment for which recess, and it gets them playing TOGETHER.

Rules 3 and 4 are rarely needed.... But for some kids, bless their hearts, it doesn't matter how many chances I give them, when they check out equipment, it doesn't come back (or worse, it gets kicked over the fence, into the road, and run over by a semi... True story!) so, for those rare occasions when they just can't follow directions, their stick goes to "lose a turn" for a while. If their stick is there a LOT, or if they damage multiple pieces of equipment, I have been known to throw their stick in the garbage can.... Again, this is rare, but it HAS happened. Yes, I'm *that* mean! Lol!

Rule 5 -- I am super forgetful and don't always reset the sticks at the end of the day, so I added a "recess chart helper" to my helper chart. The recess helper can reset the sticks if I have forgotten (which is pretty much every day...) Kids love to help, and I'm always thankful for their helping hands!

Thanks so much for stopping by. If you like this idea, please PIN it and spread the bright idea with others :)

Ready to hop to the next great idea?

Click the graphic below to read all about testing goody bags from Heather at "2 Brainy Apples", or see the linky below to hop by grade level.

2 Brainy Apples

Friday, March 7, 2014

5 Star Writing {& a freebie}

This year, my school set a goal to improve in writing. I will admit, while I love doing writing activities with my class, I am definitely not an expert when it comes to teaching writing. I think that's because we don't have to take standardized writing tests in second grade, so I've never stressed about it too much. I have my kids write in their journals each day, but it's more just for leisure as it's not graded. And while we do write stories and stuff, it's just never been the biggest focal point of my instruction (perhaps because the math and reading instruction take up so much time every day!)

Anyway, my principal bought each of us a "four-square writing" book at the beginning of the year, and it's been somewhat helpful, but there was still something missing and I couldn't quite put my finger on it.... Until now!!

Last month, we had a training with all of the lower grade teachers, and one of our kindergarten teachers shared with us a great freebie she had found on TPT. It was exactly what was missing from my writing instruction.... Except that it was designed specifically for kindergarten, and revolved around only writing ONE sentence. I decided to make my own poster, and also a kid-friendly checklist for my students to complete as they work on their writing.
** please note, I tried to contact the original creator of the kindergarten writing posters, but she never wrote back to me, so I hope she doesn't mind me re-working  the poster to suit the needs of my second graders.**

Here is my version of "5 start writing"... I love that it is very simple and straightforward. I emailed the poster to my principal and he was nice enough to order them in poster size from our district print shop so that we can hang them in our classrooms. And while this was designed with second grade in mind, many teachers in our building ordered it for upper grade classrooms too, so it's very versatile and can be used across many grade levels. (There is also a kindergarten version that has the 5 steps for writing just one sentence if you want that one instead.)

This week, as my class was working on their "Cat in the Hat" stories for Dr. Seuss week, they had to keep revising their rough drafts until it was perfect "5 star writing" in order to be given the cute stationary to publish their stories. Many students are still working on their 5 stars and will continue working on their stories next week, as they refine their "5 star" skills!

This has been a great motivator in my classroom, and I hope it's something you can use too! What do you do for writing instruction??


Monday, February 24, 2014

3 new products, pin it to win it!!

Woah.... I have been busy this past week!! If you're not following me on facebook  here's what you've been missing! Keep reading to find out how you can win one of these awesome packs!!
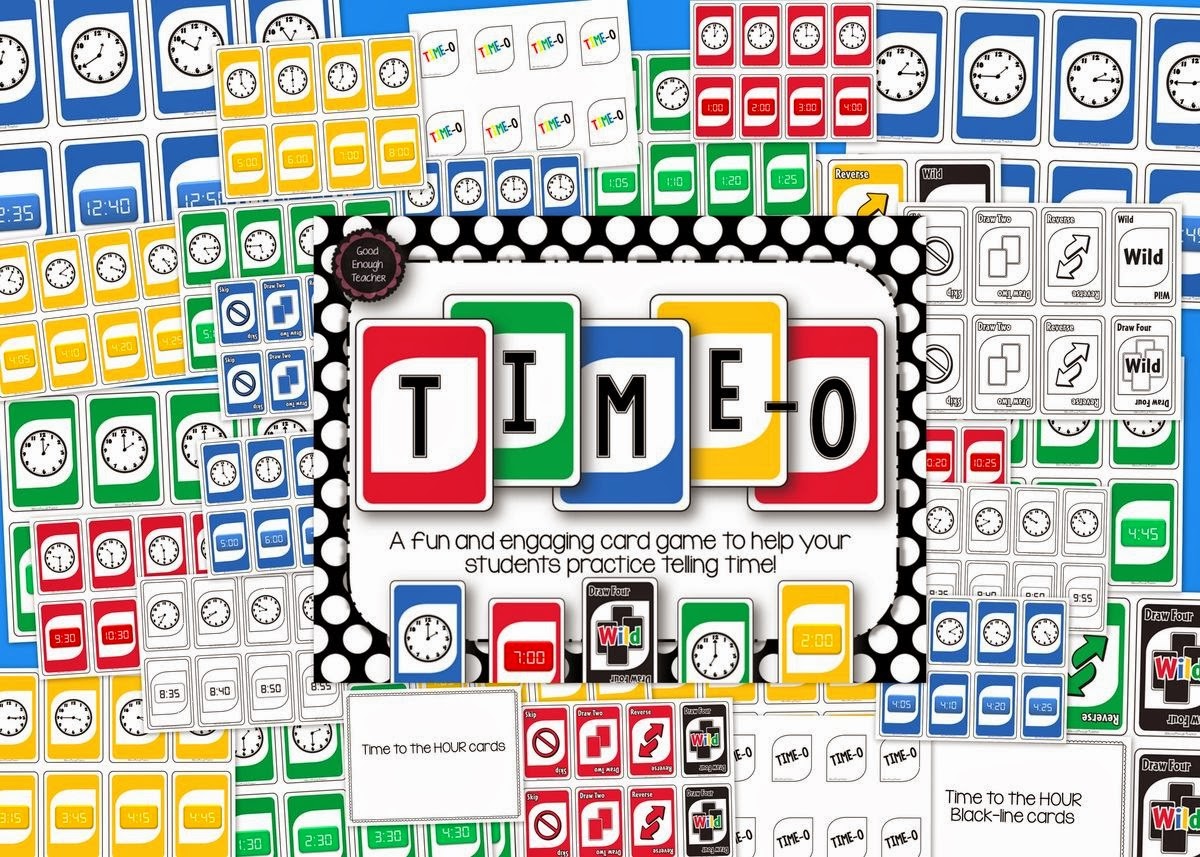
http://www.teacherspayteachers.com/Product/Time-o-telling-time-to-5-minutes-card-game-1125362

 Up first is "time-o" -- a fun and educational twist on a popular card game that kids know and love :) This packet features colored and black line cards and has EVERY TIME to five minutes (in both digital and analog). That's 200 pages of time-telling goodness!!

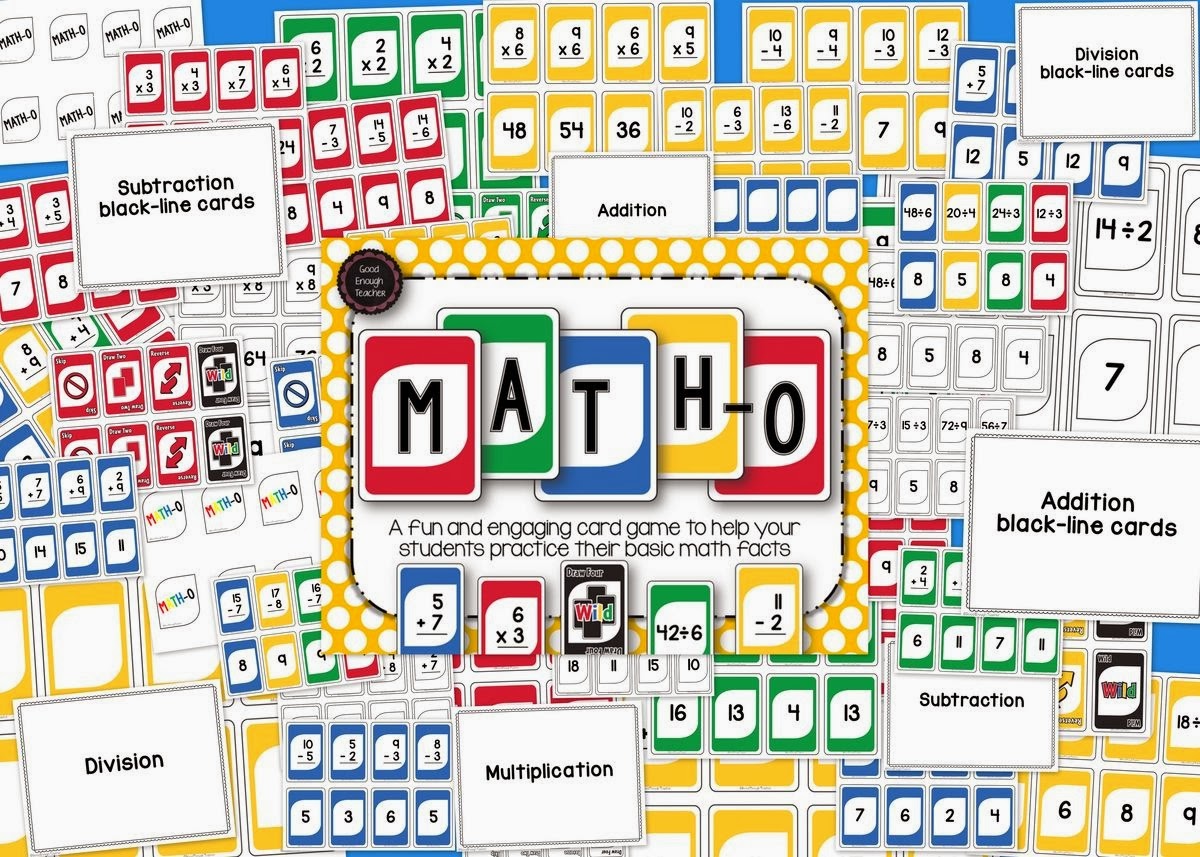
No sooner had I finished making "time-o", I had a lightbulb moment and decided to make another uno-style game for all of the basic math facts.... Thus "math-o"  was born!!

http://www.teacherspayteachers.com/Product/Math-o-addition-subtraction-multiplication-division-card-game-1127659
 
Math-o features 4 decks of cards: addition, subtraction, multiplication, and division. Each deck of cards has 36 problems along with their respective answers. The problems are called the "basic 36s"... If you are not familiar with the basic 36s, you can read more about them here. This is a great review game for any time of the year.  I plan on making a few sets to keep on hand for indoor recess!!

And as if those games weren't enough, I also made a whole pack of first grade common core aligned math vocabulary word wall cards  This has been requested for a while, but I just haven't had the time or energy to do much of anything! I feels good to be back in creation mode again :) I am hoping to make the 3rd grade set soon, so hang tight if you teach 3rd grade. Ummm, hello?! These are even cuter than my original second grade set!! I think I might have to give those a little makeover. I'm already jealous of the adorableness of this set!!
 
http://www.teacherspayteachers.com/Product/First-Grade-CCSS-Math-Vocabulary-Word-Wall-Cards-1130757
One more thing before the giveaway.... Did you hear the big news from TPT?! They are officially THREE MILLION MEMBERS STRONG. And that is a great reason to throw a sale :) the sale is on Thursday and Friday this week, and you can save up to 28% in my store by using the code TPT3 at checkout. My cart is already overflowing with goodies. Go load up your cart now and the products will all go on sale automatically on Thursday :)


And now it's your chance to win. Simply pin whichever product you would like to win, and enter the link using the rafflecopter below.... I'll pick a winner on Thursday so that you will know who the winner is before the sale ends on Friday (but don't worry, I'll leave my store on sale all weekend just in case you forget!)
a Rafflecopter giveaway